- 1. Installing the plug-in
- 2. Running Neat Video on a sample video clip
- 2.1. Open the sample clip
- 2.2. Add Neat V >Video > Filters. menu item to open the list of used filters:
- 2.3. Configure Neat V >Build Noise Profile button to open the main Neat Video plug-in window. (If you run the Demo plug-in, click Ok in the popup splash screen of the plug-in to proceed further).
- 2.4. Render the v >File > Save as AVI. menu item in VirtualDub and proceed to render the clip.
- Плагин Neat V >
- Спасибо за скачивание Neat Video Demo plug-in for Virtual Dub программного обеспечения c нашего сайта
This guide is for Neat Video v4 plug-in for VirtualDub being used with VirtualDub 1.9.11.
If you use another Neat Video plug-in or another editing application, please select the corresponding quick start guide.
1. Installing the plug-in
To install the Neat Video plug-in for VirtualDub
- Make sure you have started VirtualDub at least once before installing the plug-in. If you have not done that yet, start VirtualDub and exit it.
- Download the installer of Neat Video for VirtualDub:
- If you already purchased the product and have a current license for the Home or Pro plug-in, please download the corresponding Home or Pro plug-in from My Products page
- If you want to try Neat Video before purchase, please download the Demo plug-in from Download page
- Double-click the downloaded EXE file to start the installer.
- Proceed through the steps of the installation process.
When you install Neat Video, Setup asks you to specify VirtualDub’s ∖plugins∖ subfolder to install the plug-in there. - Start VirtualDub and find Neat Video in the list of filters: Video > Filters… > Add… > Neat Video v4 .
In case the plug-in was not installed into the right folder, you still can manually install it into VirtualDub using the guidelines below.
To manually install Neat Video plug-in into VirtualDub
- Copy the NeatVideo4.vdf file from the Neat Video installation folder
(typically, C:∖Program Files∖Neat Video for VirtualDub∖) into the ∖plugins∖ subfolder inside the VirtualDub folder.
Typically, the NeatVideo4.vfd file should be copied to:
C:∖Program Files∖VirtualDub∖plugins∖
If you install the 64-bit version of Neat Video, please make sure you specify the ∖plugins∖folder (or ∖plugins64∖in newer versions of VirtualDub) of the 64-bit version of VirtualDub.
For the 32-bit Neat Video specify the ∖plugins∖folder (or ∖plugins32∖in newer versions of VirtualDub) of the 32-bit version of VirtualDub.
In case the plug-in has not become available in VirtualDub, please contact Neat Video support for assistance.
2. Running Neat Video on a sample video clip
Please download the test-kit prepared to help you start using Neat Video. Having downloaded, please unzip it to a new folder on the hard disk.
The test-kit includes a sample video clip: SampleClip.mp4. This is a typical video clip captured by a digital video camera in high-gain mode. Some technical information about the sample clip is available in the SampleClipInfo.txt file.
Please start VirtualDub and go through the steps below to clean the clip using Neat Video.
2.1. Open the sample clip
1. Configure a new project in VirtualDub
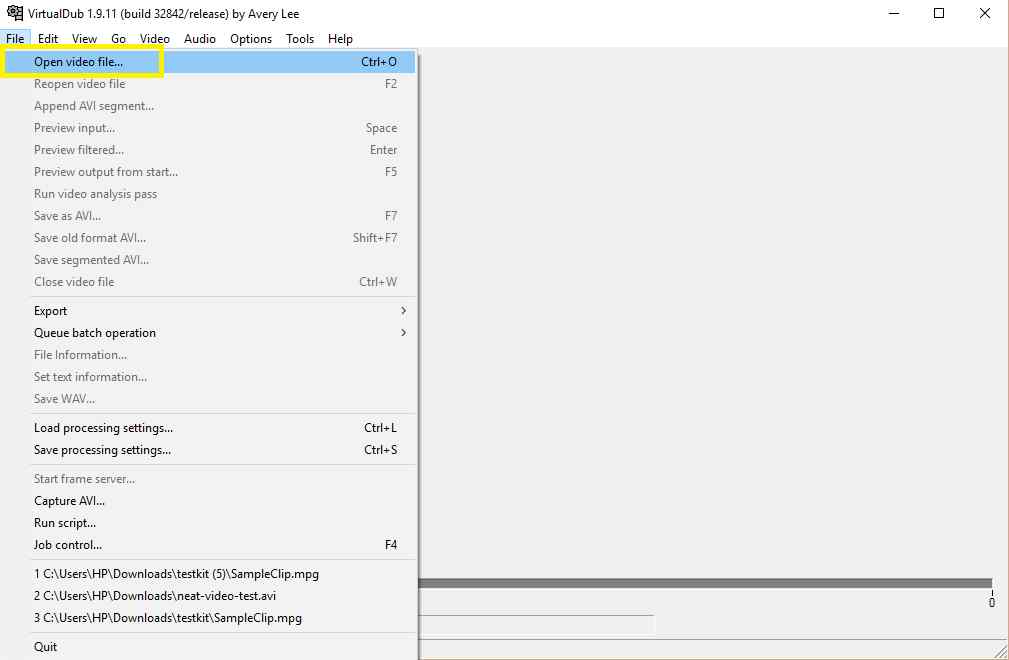
Use the File > Open Video file … menu in VirtualDub to open the SampleClip.mpg file:

The VirtualDub preview window will display the sample clip and you will see that there is strong noise in it. The task of Neat Video is to reduce this noise.
2.2. Add Neat V >Video > Filters. menu item to open the list of used filters:

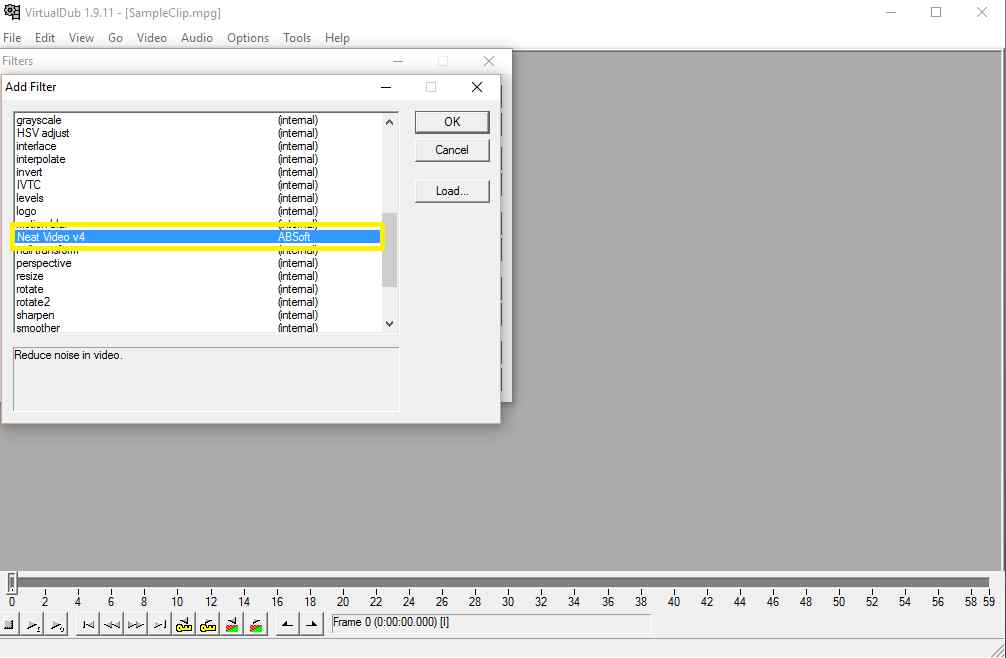
- Click the Add. button to open the list of available filters:

- Select the Neat V >OK button:

VirtualDub will add the Neat Video filter and will open the frame selection window.
2.3. Configure Neat V >Build Noise Profile button to open the main Neat Video plug-in window.
(If you run the Demo plug-in, click Ok in the popup splash screen of the plug-in to proceed further).

The Neat Video plug-in window will open and display the current frame from the clip.
Select Progressive in the popup dialog (if Neat V >Neat Video plug-in window.

2. Build a noise profile for the clip
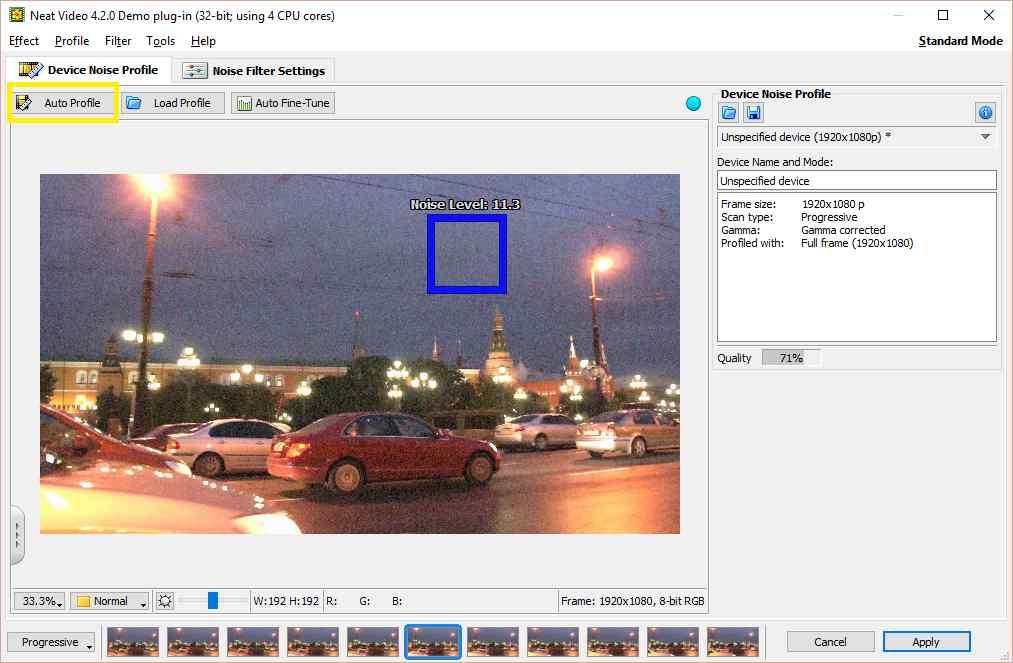
To reduce noise in this frame and in the whole clip, Neat V >Auto Profile function:
Neat Video will then automatically analyze the noise to build a new noise profile:

- Visually inspect the selected area — it should contain no visible details, only noise; otherwise the noise profile and subsequent noise reduction may be inaccurate.
If the selected area does contain any details, move the selection to a featureless area or simply draw a new selection in such an area (the selection must be at least 32×32 pixels large). Then click the Auto Profile button again.
After that Neat Video is ready to filter the clip.
3. Check Preview
- Switch to the Noise Filter Settings tab

You will notice that Neat Video has already applied noise reduction based on the default filter settings and the preview shows a clearly visible difference: there is less noise than in the original frame.
You can try to adjust the filter settings and see how that affects the results. For example, try to adjust the Temporal Filter > Radius setting (in the Temporal tab in the Filter Settings box in the right part of the window) from 2 to 1 or to a higher value. This will apply weaker or stronger temporal noise reduction to the frame.

4. Apply the changes
- Click in the bottom of the plug-in window.
Neat Video will save the current settings and close its main window.
(If you run the Demo plug-in, it will also describe the limitations of the Demo version at this point).
Once this step is completed and Neat Video window is closed, the filter is ready for work.
The preview in VirtualDub now shows the clip with noise reduction applied to it:

2.4. Render the v >File > Save as AVI. menu item in VirtualDub and proceed to render the clip.
This will automatically apply Neat Video noise reduction to the sample clip and save the result to a new video file on the hard drive. You will then be able to open this new file, evaluate the filtration results and adjust the filter settings if necessary.
Please see the User Guide for more details about adjusting the filter settings and other aspects of using Neat Video. These Video Tutorials will also help you to get the most out of Neat Video noise reduction.
Плагин Neat V > 
Как я написал выше это не что иное как плагин — шумодав, для таких программ как Premiere Pro, After Effects,Vegas Pro,Pinnacle Studio, VirtualDub и Final Cut. (полный список и совместимости внизу). Применяется прежде всего по назначению — удаляет цифровые шумы в видео и фото. Работает на твердую пятерку.
Итак что же он умеет в целом?
Самое главное убирает такие шумы как: цифровые-камкодерные (появляются при большом повышении iso), шумы при записи видео с тв-тюнеров, при записи с DV-аналоговых кассет, артефакты появившиеся при сжатии, легко убирает цветовые полосы.
Например:
Для каких программ?
After Effects (Win или Mac)
- Adobe After Effects CS5.5 / CS5; 64-bit
- Adobe After Effects CS4 / CS3 / 7 / 6.5 / 6; 32-bit
Adobe Premiere (Win или Mac)
- Adobe Premiere Pro CS5.5 / CS5; 64-bit
- Adobe Premiere Pro CS4 / CS3 / 2 / 1.5 / 1; 32-bit
- Adobe Premiere Elements 9 / 8 / 7 / 4 / 3 / 2 / 1; 32-bit
Final Cut (Mac)
- Apple Final Cut Pro 7 / 6
- Apple Motion 5 / 4 / 3
- Apple Final Cut Express 4
Sony Vegas (Win)
- Sony Vegas Pro 10 / 9 / 8.1; 64-bit
- Sony Vegas Pro 10 / 9 / 8 / 7 / 6; 32-bit
- Sony Vegas Movie Studio 10 / 9 / 8 / 7 / 6
Pinnacle Studio
- Pinnacle Studio 14 / 12 / 11 / 10.2+
VirtualDub
- VirtualDub (Win; 32-bit and 64-bit)
- AviSynth scripts
Работает в качестве OpenFX плагина! (для тех программ которые поддерживают технологию расширений с помощью ofx-плагинов). Например:
- Foundry Nuke 6.0+ / 5.1+ (Win; 32-bit and 64-bit)
- Eyeon Fusion 6.0+ / 5.1+ (Win; 32-bit and 64-bit)
- Foundry Nuke 6.0+ / 5.1+ (Mac; 32-bit)
- Foundry Nuke 6.1v2+ (Mac; 64-bit)
Различают несколько версий этого плагина это Demo, Home и Pro. Отличаются функциональностью, например в демо нельзя выводить видео больше 640х360 и длительностью более 30 минут. В home версии есть ограничение на разрешение можно использовать видео только DVD размера, не HD. Ну а в Pro версии можно использовать все функции без ограничений.
Стоиомость плагина: Демка — бесплатна, $49.90 Home версия, $99.90 Pro версия ($199.90для некоторых версий).
Если загрузка не началась, нажмите здесь.
Спасибо за скачивание Neat Video Demo plug-in for Virtual Dub программного обеспечения c нашего сайта
Загрузка была проверена на наличие вирусов. Но мы также рекомендуем вам проверить файлы перед установкой. Загружаемая версия Neat Video Demo plug-in for Virtual Dub 3.0. Эта программа является бесплатной. Скачивание осуществляется без каких-либо изменений с нашей стороны.